 After the paste has been applied spray the model with a white spray. You can airbrush for greater detail but as this is for those of us who can't fork out 80-100 pounds on equipment, I'll leave it up to you to make decisions on how much detail you go to. Once the paint is thoroughly dry (if your not patient there will be a very sticky, minty, mess) wash the model with water. Not only will the toothpaste wash off so will any spray that has stuck to the paste. This will reveal the undercoat and give you an interesting effect. Try it and see what you think.
 Well with another post over I am back to hard core painting of Blood Angels. I have less than 6 weeks to go and have changed my list for the 7th time. I only have 5 terminators and 5 very nearly finished devastators to go (more on those next week). Right, back to the warp I go. At least this time I'll face the perils of the warp with minty fresh breath. Toodles.
 |
| "The enemy will never see us coming. Now where should I put this flag!" |
Wow being stuck in the warp you never know when (or where) you might materialise. Welcome back to another heart stopping post coming straight to you from the very depths of the void. This week I talk a bit about weathering techniques, namely toothpaste. I was talking to some friends of mine about their favourite ways of creating chipped and weathered paint on armoured vehicles. They mention using salt, hairspray and other weird and wonderful methods. Now, listening to these methods I thought I'd pipe in and give my own technique that I found whilst scrolling through forbidden tomes and manuscripts. It involves using that very well known modelling supply...toothpaste. After much ridicule, pointing and taking of the mike I was given time to explain. So I thought I'd explain to you...
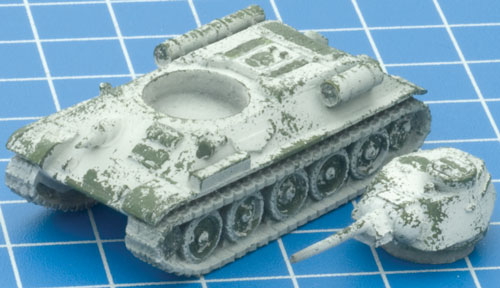
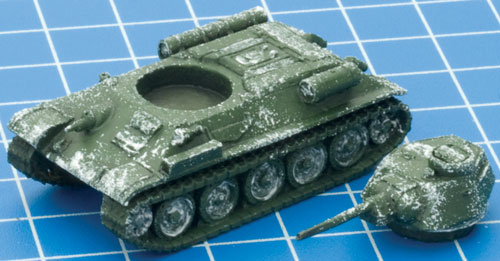
It began on a wintry day in 1943 Soviet Russia. The cold winter was creeping over the vast barren wasteland. Realising that green tanks tend to stick out in the snow like the time Darth Vader and Luke Skywalker took part in the bring your son to work day (sorry no clip). To overcome this both the German's and Russian's used white wash to paint their tanks to match the bleak winter season. As this was in short supply it was often thinned down hence the reason why the tanks quickly became mottled with green. I wanted to achieve this look for a possible future winter themed army in flames or 40k. So I got to work.
 |
| P.S. these are not my pictures as my ones got lost. |
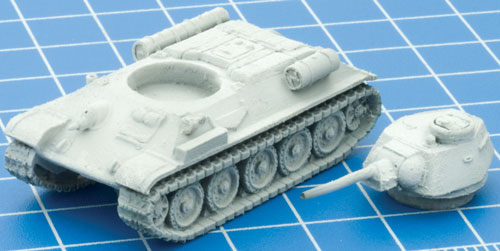
Firstly, take your tank model and give it a undercoat in whatever colour you wish the armour to be. I used an old rhino model but I discovered this works on any tank especially Flames of War models. I found a good dark green or grey works best for this technique.
Next when the basecoat is dry you can apply the toothpaste. The toothpaste acts as a liquid mask. I have found that using a stippling brush or in fact a tooth brush is good for adding the paste for a more natural chipping effect.
 After the paste has been applied spray the model with a white spray. You can airbrush for greater detail but as this is for those of us who can't fork out 80-100 pounds on equipment, I'll leave it up to you to make decisions on how much detail you go to. Once the paint is thoroughly dry (if your not patient there will be a very sticky, minty, mess) wash the model with water. Not only will the toothpaste wash off so will any spray that has stuck to the paste. This will reveal the undercoat and give you an interesting effect. Try it and see what you think.
 Well with another post over I am back to hard core painting of Blood Angels. I have less than 6 weeks to go and have changed my list for the 7th time. I only have 5 terminators and 5 very nearly finished devastators to go (more on those next week). Right, back to the warp I go. At least this time I'll face the perils of the warp with minty fresh breath. Toodles.
No comments:
Post a Comment