Showing posts with label Painting tips. Show all posts

Monday, 10 December 2012

Always Brush After Painting.


"The enemy will never see us coming. Now where
should I put this flag!"

Wow being stuck in the warp you never know when (or where) you might materialise. Welcome back to another heart stopping post coming straight to you from the very depths of the void. This week I talk a bit about weathering techniques, namely toothpaste. I was talking to some friends of mine about their favourite ways of creating chipped and weathered paint on armoured vehicles. They mention using salt, hairspray and other weird and wonderful methods. Now, listening to these methods I thought I'd pipe in and give my own technique that I found whilst scrolling through forbidden tomes and manuscripts. It involves using that very well known modelling supply...toothpaste. After much ridicule, pointing and taking of the mike I was given time to explain. So I thought I'd explain to you...

It began on a wintry day in 1943 Soviet Russia. The cold winter was creeping over the vast barren wasteland. Realising that green tanks tend to stick out in the snow like the time Darth Vader and Luke Skywalker took part in the bring your son to work day (sorry no clip). To overcome this both the German's and Russian's used white wash to paint their tanks to match the bleak winter season. As this was in short supply it was often thinned down hence the reason why the tanks quickly became mottled with green. I wanted to achieve this look for a possible future winter themed army in flames or 40k. So I got to work.

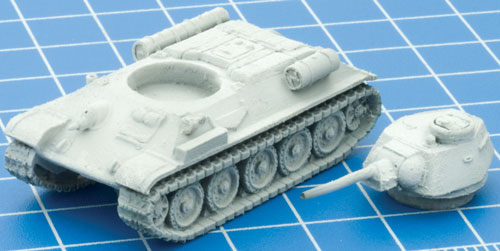
Add toothpaste mask completed
P.S. these are not my pictures as my ones got lost.
Firstly, take your tank model and give it a undercoat in whatever colour you wish the armour to be. I used  an old rhino model but I discovered this works on any tank especially Flames of War models. I found a good dark green or grey works best for this technique.

Next when the basecoat is dry you can apply the toothpaste. The toothpaste acts as a liquid mask. I have found that using a stippling brush or in fact a tooth brush is good for adding the paste for a more natural chipping effect.

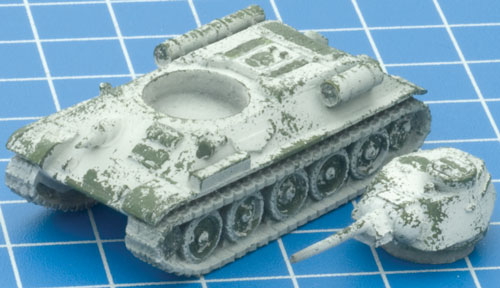
White paint appliedAfter the paste has been applied spray the model with a white spray. You can airbrush for greater detail but as this is for those of us who can't fork out 80-100 pounds on equipment, I'll leave it up to you to make decisions on how much detail you go to. Once the paint is thoroughly dry (if your not patient there will be a very sticky, minty, mess) wash the model with water. Not only will the toothpaste wash off so will any spray that has stuck to the paste. This will reveal the undercoat and give you an interesting effect. Try it and see what you think.


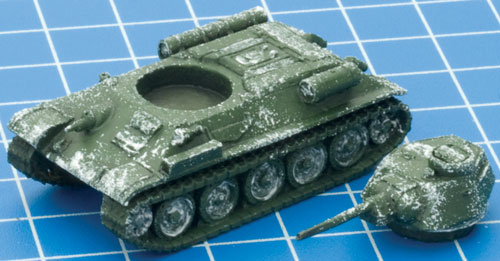
Toothpaste mask has been scrubbed offWell with another post over I am back to hard core painting of Blood Angels. I have less than 6 weeks to go and have changed my list for the 7th time. I only have 5 terminators and 5 very nearly finished devastators to go (more on those next week). Right, back to the warp I go. At least this time I'll face the perils of the warp with minty fresh breath. Toodles.

Wednesday, 18 July 2012

6th Edition First Impressions

Welcome, welcome, as we set sail into the heart of the unknown, aboard the Folly of War. These last couple of weeks have been busy ones both with work and with painting. My Blood Angels army is steadily growing (I'm verging on 1500 painted!) and I have been feverishly playing games of 6th edition to try and smooth over any rules issues. So far I have played a total of 4 games and have won a grand total of... 0. However, this has not in anyway been a bad thing. Each game has given me a new aspect to learn or changed the way I have interpreted the rules. For example, I found out that jump packs must decide which phase they will jump in (movement or assault). If they jump 12" in the movement they do not get the hammer of wrath rule or re-roll to charge.

Another area where the game has changed dramatically is aircrft (I am trying to stop calling them Flyers as it makes me sound like I have the vocab of a 10 year old child). Now, I have a bit of a soft spot for aircraft, as my dad used to work at Heathrow and my girlfriend's dad works at Duxford. So, when an opportunity to include models that add an extra dimension to the gaming table I flew (pun intended) at the chance to make plane noises during the movement phase (they should've added something along the lines of this in the new book. "You must make a neeewooaaaah noise every time you move an aircraft else the engine stalls and it crashes").  Using aircraft is so much fun and can really freak out your opponent if they have no AA. Watching the desperation of an army unload the entire contents of their guns just to bring down a single plane is very entertaining... right up until the point that your opponent does hit your Stormbrick and it comes crashing down, killing the majority of passengers insides (damn you Jamie!!!).


I leave you with pictures of my Librarian dread. I have used the same chipping technique as before but I wanted to go another step forward with painting the Force Weapon. Using blending and washes I gradually built up a crystalline looking blade. Using 1:1:1 mix of Hawk Turquoise, Bleached Bone and Regal Blue (or equivalents if you cant get them any more) I gave the blade a solid coat then added more Bleached Bone to highlight and used Regal blue wash for low lighting. Lastly, streaks of white were added to create a reflective shimmer. Next, on the to do list of the angels is 5 scouts, another dread, a drop pod and the one I am putting off the most 7 Sternguard. Right, those marines won't paint themselves. Navigator set course to the Baal System we need reinforcements!!

Sunday, 24 June 2012

Can I Have A Free Hand?

With added free hand company shoulder pad.
Welcome back to the Folly of War, this week I want to talk about free hand painting on models. There was once a time when I used to love transfers. Back when I was a lad (before I had even glued my first space marine), I used to make airfix models. I can remember the constant battle with my parents to find somewhere to paint as airfix used oil based paints and God help me if I got any on the carpet. Once the plane was assembled and painted, I would go through the process of cutting the tiny transfers from the sheet and placing them in a bowl of water. Then repeating this step again and again because the transfer would split, folded or more commonly stick to (my mum often wondered why I was suddenly tattooed with RAF and German Iron Cross symbols). As soon as I hit making Space Marines my use of transfers stopped dead. I will always remember the frustration of trying to apply the Blood Angels symbol to a curved shoulder pad, followed by the inevitable teenage tantrum and finally ritual using of the transfer sheet as a paint pallet just so I felt better. Now what has this got to do with free hand painting I hear your cry....

Well let me tell you. I have always loved the iconography of 40k and squad markations of battle groups in WW2 so leaving models without squad numbers and symbols is just a no go for me. It wasn't until, I started working with Animatronica that I became interested at adding free hand detailed on my miniatures. He had painted a fantastic Baneblade Tank to go with his Chaos Alpha Legion just around the time when the Apocalypse rules came out. He named the Tank The Tower of Snakes (if you wish to see some of his work click on the blog of the same name) and had painted an amazing hydra down the side of the of the armoured tracks. It was stunning and I asked him how he achieved such an amazing results. He explained that you must always draw out your design, this gives you a base to work from and then build up the colours as you would for normal highlighting.
Devastator Sgt with Tycho's personal banner.
So starting small I started on some campaign badges for my Black Templars. This was easy enough, a simple shield shape with a red stripe. From then on nothing could stop me I moved on to chapter badges and then finally banners. I can have the most fun with the banners because you record your own victories and also historical battles. One of my Marshals has a banner of Helsreach Spire. Free hand painting takes time but with practise the results can be superb. I began to develop my own styles and techniques which suited my designs. One such technique I use now is to block out the design in silhouette with black and then build up block colours. I have had a lot of fun with painting my Blood Angels and I have increased the amount of free hand work on the marines. I hope that some where out there in Internet land you have a go too. Before I go I will leave you with some more Blood Angels goodness. Captain Tycho is almost finished with non traditional colour scheme. I'm leaving the gold armour behind for red. Personally I feel that the gold armour is far to garish and I want to tone him down.  Next week I plan to cover the 6th edition release so stay tuned.
Devastators with added light effect on the plasma cannons.
Captain Erasmus Tycho of the 3rd Company (work in progress).

Sunday, 29 April 2012

Rain, Rain Go Away!

When it rains it pours... Why should rain bother a run of the mill wargamer/painter? This weekend gave me an opportunity to start work on my Panther Company (my girl friend buggered off shopping with her friend, her words). However, like the Germans advancing through Russia in 1943 the weather has slowed down my progress to a grinding crawl. The rain has an effect on just about every aspect of painting and can ruin plans for getting things done. How so I hear you cry? Let me Explain:


  • Spraying in damp conditions is a nightmare. The spray can clump, dry misty and ruin the look of the models. Luckily I have a spray shed but I can assure you that running between my house and my shed in the pouring rain is not fun. It was also a huge de-motivator.
  • Secondly, drying times. I don't know if any of you have this issue but in the cold and damp paint, inks and sprays seem to take decades to dry. This meant I have been jumping from project to project. In the long term this will be great as it means that I have continued with a lot of different projects but it does feel like I haven't done anything.
  • Finally, light. The clouds have shaded my house all weekend and the gloom has distorted the colours. (I really need a daylight lamp).
Even through these difficult times (hose pipe bans are very traumatic). I did manage to finish one platoon of Panthers and a small farm cottage. Other projects I have flitered to were... Blood Angel Tactical squad, British Para Mortar Platoon and a Fortified Manor 15mm Pics soon!


Before I leave to set sail to hopefully sunnier climates a product review. I have brought some of the new GW paints to test them out. They are great! The new bases and layers work well together and GW has produced some wonderful painting guides to show which paints layer well to create blends. The coverage is good and if you select the correct colours the highlights can be made to look very subtle. The texture paints for basing are good quality but to me are not going to be a replacement for good old sand and flock. The do come in a variety of colours but I think they would be better for using as mud on tank treads.

Right I'm off brolly in hand into the deluge of  painting seeya.

Sunday, 22 April 2012

SALUTE 2012

This is the voice of the Mysterons
Ahoy there. Welcome to another post aboard the Folly of War. This week I set sail for SALUTE 2012 for the first time ever. All I can say is wargame heaven. There was an astounding amount of different companies, games and miniatures out there. Highlights of this year was the giant game of Captain Scarlet which, brought me back to the days of youth watching the program with my dad on a Friday evening. I couldn't believe the detail of the scenery!

  
Dystopian Wars was also present and again the tables that Spartan games has were really inspirational. One table used all three elements of the game (Land, sea and air). It displayed a battle involving a beach landing on a central island.


Here comes the clowns. (EDEN)
New games that caught my eye were EDEN and Dropzone. EDEN (a french game) is another post apocalyptic skirmish game. The reason I took this game was the miniatures in particular the gang of psychopathic clowns and circus freaks (watch this space I may be getting some soon). The other game of note was Dropzone (released later this year). Now, I came to SALUTE having just completed Mass Effect 3 then I saw the miniatures of the ships for one of the alien races and my jaw dropped. I am not saying that Hawk Miniatures have ripped of EA but make your decision here (naughty). However I will be ordering as many of those minis as I can.

Knees not included
Finally a product review. Many readers will know I am a HUGE fan of Flames of War and SALUTE gave me the chance of buying a new Axis army as I only have Allies. Blood, Guts, and Glory has just hit the shelves and I really wanted to paint some tanks. Scouring the trade stands I came across the Plastic Toy Soldier Company (check them out here). An issue that many wargamers have is budget and Flames can be a little pricey when it comes to buying tanks. The Plastic Toy Soldier Company solves this problem. Money in hand I purchased two boxes of plastic Panther Gs for the same price as one of battlefront's resin boxes. The quality of these models is very good to high but as they are plastic lack certain details, such as anti mine paste and stowage. The sprue gives you options to make three variants of panther and crew. I have started to work on them using liquid green stuff for the anti mine paste and adding twigs and sponge for added camouflage. Overall, I feel that this company have got it spot on with the cost to detail ratio. These are perfect for any Flames game and with a growing product list (the Panthers have only just come out), this company will be making more of an appearance in my Flames purchases.

My Panther G with added camo.
There were so many wonderful things at SALUTE this year and I could have spent all weekend at the EXCEL centre. I recommend anyone to go as I will definitely be going next year. I leave you with a picture of one other small purchase all fear the mighty knitted Cthulu!
Fear his mighty button eyes!!!


Wednesday, 28 March 2012

Secret Diaries of a Zombie Call Girl.

Hello mid week gamers. I thought I'd do an early post this week as I'm off to Arnhem to see the streets for myself. I am very excited and expect to see many a photo and inspiration for another Flames Army. Anyhoo to the real reason I'm posting. My Malifaux crew of 25 points is complete. This has been a wonderful project and I have really enjoyed thinking about how I could make the links to Lewis Caroll's Alice in Wonderland.

Firstly, I would like to thank my girlfriend for the choice of colours that these ladies of the night are adorned with. I recommend that if you ever find yourself thinking about the colour of uniforms or clothing go ask your partners. Women's innate ability to choose the correct shoes to match their outfit seems to work in the miniature world too! Never before did I think that I world hear the words "I wouldn't be seen dead in that!" (pun intended) Followed by an argument about how a pink dress should be accessorised. Taking fashion advice for your models is worth doing as I am sure you will agree. So again, thanks Joolz!

I am very pleased with how Madame Sybelle has turned out. Based on the Queen of Hearts I spent a lot of time free hand painting extra hearts on the bodice and the fan. The flesh of these zombie ladies used a mixture of tallarn flesh and rotting flesh in varying amounts. This is blended with purple wash to give a translucent appearance to the skin. The skin was then given a liberal brushing of a mixture of the old GW paints chestnut and red inks. Their glossy finish gives the blood splatter a suitably wet finish.

Finally, I painted Alice using the Bete Noir model from the range. This gave me a chance to practise painting white in a different way to my usual method. Using the same technique of base, shade, base, highlight I managed to achieve the desired result. This model is very simple as there are not to many accessories on it. To give the model that extra something I added some extra blood splatter across the dress (you can't have enough blood!)


Well I'm off to explore the Dutch countryside hopefully 30 corp will make it to reinforce my position and bring me back in time for tea... Or maybe it'll be a Bridge too Far!